Why Choose a Tankless Water Heater
A tankless water heater heats water on demand instead of storing it. That means no wasted energy keeping a large tank hot all day. Here are the main benefits:
- Endless Hot Water: You never have to wait for a tank to refill.
- Energy Savings: Water heats only when needed, lowering utility bills.
- Compact Design: Units mount on the wall, saving floor space.
- Longer Lifespan: With proper maintenance, they can last 20 years or more.
Upgrading to a tankless unit can improve your home’s comfort and efficiency.
Step 1: Select the Right Tankless Water Heater
The first step in learning how to install a tankless water heater is selecting the right system for your household. There are two main types: gas and electric.
- Gas units heat water faster and are ideal for larger families.
- Electric units are easier to install but may not meet high-demand needs.
Consider these factors:
- Flow rate (GPM): The amount of hot water the unit delivers per minute.
- Fuel availability: Check your gas line or electrical capacity.
- Ventilation: Gas units require venting for exhaust gases.
If you are unsure which model suits your home, reach out to a plumber in Franklin, IN like First Response Plumbing & Excavation for trusted recommendations.
Step 2: Gather Tools and Materials
Before starting your DIY tankless water heater installation, make sure you have the proper tools and materials ready.
Tools you’ll need:
- Adjustable wrench
- Screwdrivers
- Drill with hole saw
- Pipe cutter
- Level
- Gas leak detector (for gas models)
- Teflon tape and plumbing sealant
Materials:
- Tankless water heater
- Mounting kit
- Water and gas shut-off valves
- Flexible water connectors
- Vent kit (for gas models)
- Electrical wiring (for electric units)
Being prepared ensures a smoother tankless water heater installation process.
Step 3: Turn Off Power, Gas, and Water
Safety is critical. Before removing your old unit, turn off your home’s water supply and shut off power or gas lines. If you are replacing a tank heater, connect a garden hose to the drain valve and empty it completely. Once drained, disconnect the plumbing and power connections.
If working with gas lines or high-voltage wiring feels unsafe, have a licensed plumber complete this step for you.
Step 4: Mount the Tankless Unit
Tankless units are designed to hang on the wall. Choose a location that allows easy access to plumbing and ventilation. Avoid cramped, unventilated areas.
Mounting tips:
- Follow the manufacturer’s template for accurate placement.
- Make sure the wall can support the weight.
- Keep enough clearance for future maintenance.
Once the mounting bracket is secure, lift the unit into place and ensure it sits level.
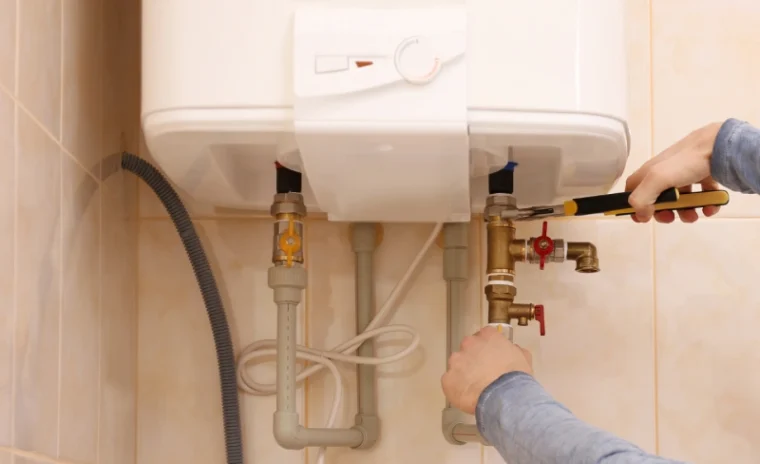
Step 5: Connect the Water Lines
Now it’s time to attach the cold-water inlet and hot-water outlet. Use flexible stainless steel connectors for ease of installation.
Pro tips:
- Install shut-off valves on both lines for easy maintenance.
- Wrap threaded connections with Teflon tape to prevent leaks.
- If you have hard water, consider installing a water softener system to protect your heater.
After all fittings are tight, turn the water back on slowly and check for leaks.
Step 6: Connect the Gas Line or Electrical Wiring
The power connection depends on your model.
Gas Tankless Water Heater:
- Use flexible gas lines rated for tankless systems.
- Apply sealant to all fittings.
- Test for leaks using a gas detector or soapy water.
Electric Tankless Water Heater:
- Run a dedicated electrical circuit to the breaker panel.
- Use the correct wire gauge and breaker size.
- Follow the wiring diagram from the manufacturer.
If you are unsure about any electrical or gas work, contact First Response Plumbing & Excavation for safe installation.
Step 7: Install Venting (Gas Models Only)
Proper venting is essential for safe operation. Venting removes exhaust gases and draws in fresh air for combustion.
Follow these key steps:
- Use stainless steel venting materials rated for high temperatures.
- Keep the vent running short for best airflow.
- Seal all connections tightly.
- Terminate the vent outdoors using an approved vent cap.
Local building codes vary, so always verify that your installation meets requirements.
Step 8: Set Up the Condensate Drain (If Needed)
Condensing gas models create moisture during operation. Connect a drain hose to the condensate outlet and route it to a floor drain or condensate pump. Ensure the hose slopes downward and remains free of kinks.
Step 9: Test and Start Up
You are almost done installing a tankless water heater step by step.
- Turn on the water supply and check all fittings for leaks.
- Open a hot water faucet to remove trapped air.
- Turn on gas or power.
- Set the temperature to 120°F for normal household use.
Your system should now deliver hot water on demand. If it doesn’t, or you notice error codes, call for tankless water heater repair and replacement assistance.
Step 10: Maintenance and Flushing
To keep your system running efficiently, perform routine maintenance once a year. Flushing removes mineral buildup that can affect performance.
Steps for annual flushing:
- Shut off power and water.
- Connect hoses to service ports.
- Circulate vinegar or descaling solution for about 45 minutes.
- Rinse with clean water.
You can schedule this through water heater repair services if you prefer a professional touch.
Common Mistakes to Avoid
Avoid these errors to ensure a successful installation:
- Using the wrong venting materials.
- Skipping water shut-off valves.
- Choosing an undersized unit.
- Forgetting to flush the system annually.
Following the correct tankless water heater installation process will help prevent these problems.
Safety Tips
- Always turn off utilities before working.
- Use approved fittings and materials.
- Do not skip leak testing.
- Never install a gas unit without proper venting.
If you ever feel uncertain during your DIY tankless water heater installation, stop and call a professional.
When to Call a Plumber
While this guide explains installing a tankless water heater step by step, some tasks are better handled by a licensed plumber. Handling gas, electrical work, or complex venting without training can be unsafe.
Our team at First Response Plumbing & Excavation can help with safe, code-compliant installation. We also handle related services like drain cleaning, water heater repair, and tankless water heater replacement.
Conclusion
Now that you understand how to install a tankless water heater, you can see what makes these systems so efficient and practical. Whether you are upgrading from a traditional tank or building a new home, a tankless system delivers consistent performance with less energy use. If you follow this tankless water heater installation guide carefully, you will know exactly how each step fits together for a safe, reliable setup.
Still, remember that handling gas, venting, or electrical wiring carries risks. When in doubt, trust a licensed local team like First Response Plumbing & Excavation in Franklin, IN to complete the job safely.
Why Choose First Response Plumbing & Excavation
At First Response Plumbing & Excavation, reliability is our promise. Since 2017, we have provided trusted residential plumbing solutions throughout Franklin, IN. With over 20 years of hands-on experience, we ensure every job is done right. We provide upfront pricing before work begins, accept cash, check, and credit cards, and offer financing when needed. From tankless water heater repair to water heater replacement, you can depend on our licensed team 24 hours a day.
Call (317) 995-3205 today for honest, dependable plumbing service in Franklin, IN.